Membership Per Member Per Month (PMPM) driver
Overview
This driver provides the basis for several important planning activities needed for your organization to budget health plans and insurance products. The system uses the information in this driver to populate the HealthPlan Operation utility.
- Depending on the level of detailed records loaded by your organization in the ACT_HP_20XX data table, the driver can bring in actual data for members, revenues, and expenses by entity, department, insurance code, location, and data type. The driver calculation methods then calculate historical PMPM values based on available history.
- The historical PMPM rates carry forward to any non-actual period. For example, if six months of actual is used, then month seven of the current year in the driver refers to the month six PMPM rate. The rates in all non-actual months can be edited.
- The PMPM rates in the projection and monthly budget columns are then used to calculate the projection and monthly budget for revenues and expenses in the HealthPlan Operations utility.
This driver provides a central location to review member lives, revenue PMPM, and expense PMPM for each health plan and specifically within each entity (or department). The enrollment percentages from the Membership Enrollment Trend driver updates the planned member lives, which also flows to the HealthPlan Operation utility.
About this driver
Note the following before configuring this driver:
- This driver is only accessible if your organization is licensed for the Axiom Budgeting Health Plan product. Only users assigned the GlobalDriverMgmt role profile have access to this driver.
- You must complete the following before configuring this driver:
- Add or edit insurance or health plan products in the INSCODE dimension. The system does not allow you to manually enter plans directly in this driver because the system automatically populates it with the plans listed in the INSCODE dimension.
- Add or edit the health plan budget data types in the DATATYPE dimension.
Add or edit department locations in the LOCATION dimension.
For instructions on updating these dimensions, see Updating dimensions for health plan budgeting.
- Configure the Membership Enrollment Trend driver before configuring this driver. If the Membership Enrollment Trend driver is not configured, the Membership PMPM driver will default to 100%.
-
The system auto populates the driver with data that is stored in the ACT_HP_20XX data table. You can enter the data manually in this table or as part of an import. Your Syntellis Implementation Consultant will help you set up the table for your organization, but you will need to maintain this table as new plans are added.
NOTE: There is no pre-defined import available to import health plan data at this time, but you can work with your Syntellis Implementation Consultant to create a custom import.
- To remove or retire a plan, you cannot delete it from the driver. For instructions, see Removing or retiring plans.
The driver makes it easy to view and manage plans by displaying entities and department using a tiered structure that follows this format:
- Entity
- Department
- Insurance/Health Plan
- Location
- Data Type
- Location
- Insurance/Health Plan
- Department
When you first open the driver, the list of locations is expanded, but you can double-click ![]() to expand or
to expand or ![]() to contract it. After you save your changes, the system remembers this setting the next time you open the driver.
to contract it. After you save your changes, the system remembers this setting the next time you open the driver.
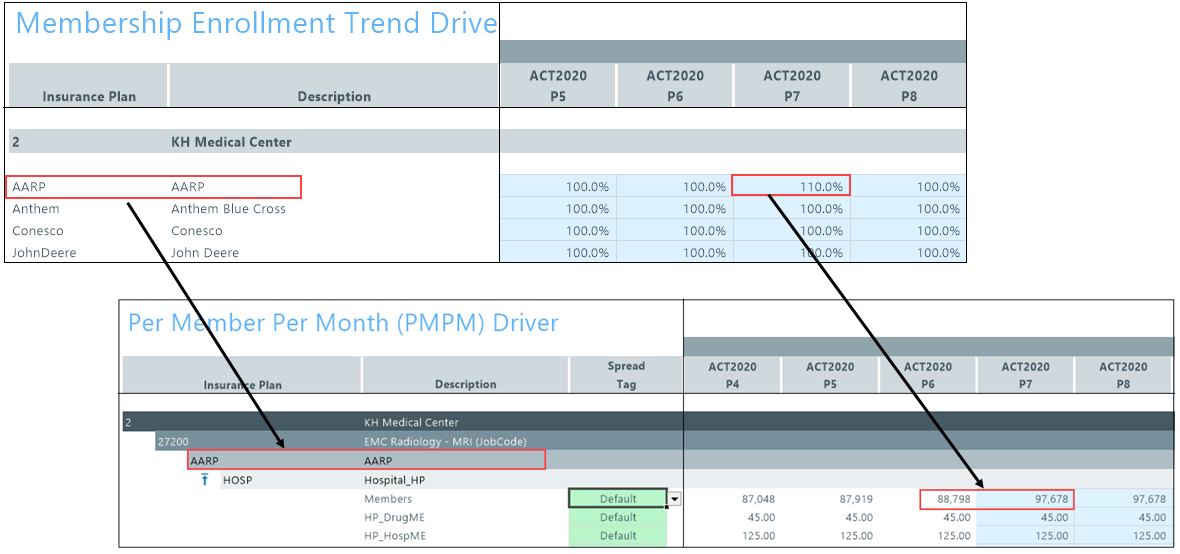
The columns to the right of the listed data types are the actuals columns that display the data stored in the Act_HP_20XX data table. The blue cells allow you to edit remaining projected by month and budgeted values, if needed. By default, the values for the membership row are calculated using the Membership Enrollment Trend driver. The system calculates these values by multiplying the previous month's enrollment numbers by the percentage for the period in the Membership Enrollment Trend driver.

Let's say an organization expects a 10% growth in their membership for period 7. The membership number for period 6 was 88,798. The system multiplies this number by 1.10 for a projected actual of 97,678 members. This calculation continues throughout the blue cells for both actuals and budgeted in the membership row. You can edit this value two ways:
- Adjust the percentage in the Membership Enrollment Trend driver
-
Edit the value directly in the actual or budget blue cell in the Membership PMPM driver
NOTE: You can usually get the plan percentages from an actuary at the insurance or health plan company.
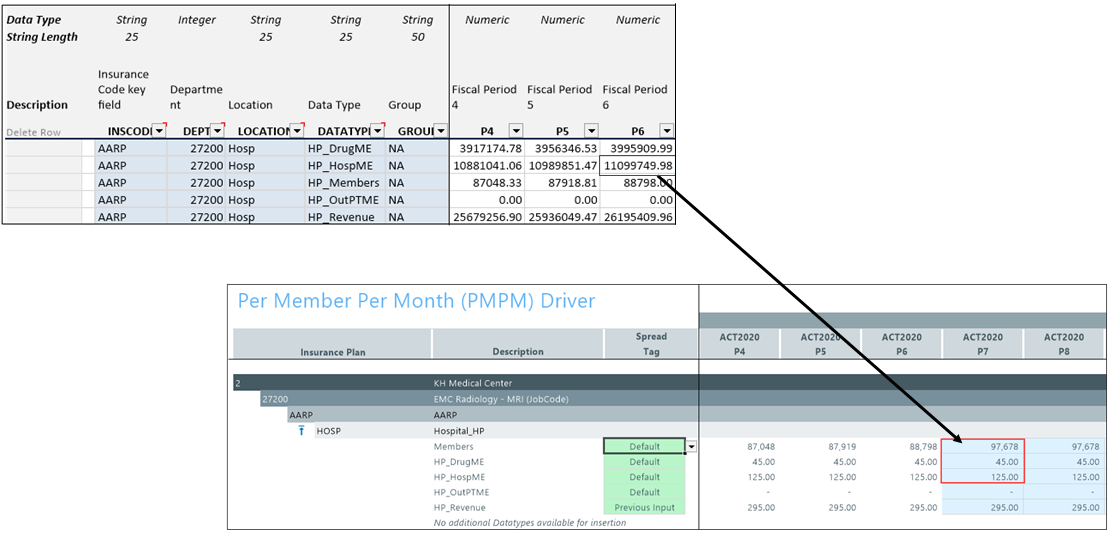
The values in the data types from both the actual and budget columns are derived by dividing the data type period value (located in the ACT_HP_20XX data table) by the number of members in the same period. In the following example, the value for hospital medical expenses for this departments plan in period 6 is $11,099,749. The system divides this amount by the number of members, in this case 88,798 and calculates the expense as $125 per member. The Membership Enrollment Trend driver provides a starting point for budgeting your health plan costs for the remainder of the year.
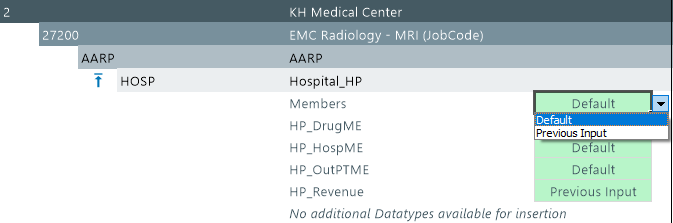
When entering remaining projected and budget values, you can either use the values that are automatically calculated by the system using the Membership Trend Enrollment driver, or you can enter your own custom values. The option you choose is indicated by the Spread Tag column. When entering and saving custom values, the Spread Tag column automatically changes from Default to Previous Input. The Previous Input option means that the system stores and retrieves the values from the Membership PMPM driver table versus using the default calculations. Even if you use custom values, you can return to using the driver-calculated values at any time by selecting Default from the Spread Tag column.
Changing views
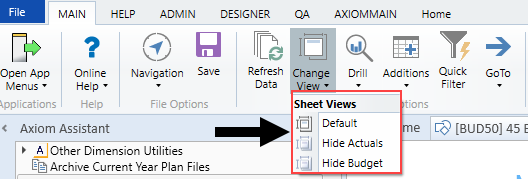
You can view specific parts of the driver from the Main ribbon tab by clicking Change View, and selecting one of the following:
- Default - Displays both the actuals and budget columns for each period as well as the projected actuals.
- Hide Actuals - Hides the actuals columns for each period. The projected actuals column remains available.
- Hide Budget - Hides the budget columns for each period.
Click image to view full size
Settings
Complete the following steps to configure this driver:
-
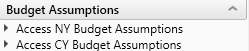
In the Bud Admin task pane, in the Budget Assumptions section, do one of the following:
- To open next year's budget drivers, click Access NY Budget Assumptions.
-
To open this year's budget drivers, click Access CY Budget Assumptions.
- Double-click 46 Budget HealthPlan Membership PMPM.
-
In the Refresh Variables dialog, do the following to filter the entities or departments that display in the driver:
- In the Filter by Entity field, type the entity number(s) or click Choose Value to select the entities, and then click OK.
- Optionally, in the Filter by DEPT.KHABgtMap field, type the department number(s) or click Choose Value to select the departments, and then click OK.
- In the actuals and budget columns, do one of the following:
- To use the default values derived from the Membership Trend Enrollment driver, select Default in the Spread Tag column (if it is not already selected).
To use custom values, type the values in the columns. When you save your changes, the Spread Tag column changes from Default to Previous Input.
TIP: Even if you enter custom values, you can go back to using the default values by selecting Default from the Spread Tag column. The system will automatically use the values calculated using the Membership Enrollment Trend driver. After you save your change, the system will change the spread tag from Previous Input back to Default to indicate that these are driver-calculated values.
For more information on how the spread tags work, see Understanding the interface in the section above.
- After making your changes, click Save.
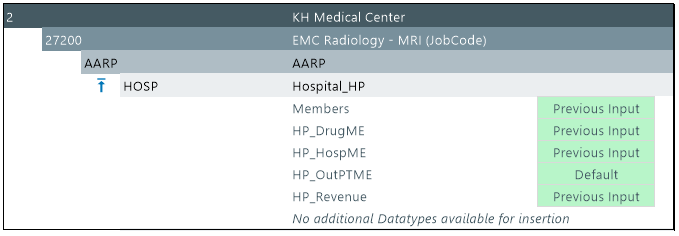
Adding data types
To add a data type:
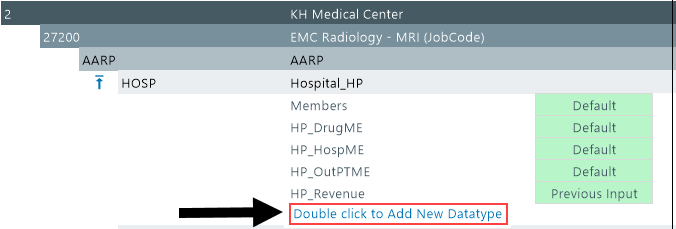
-
In the list of data types, double-click Double click to Add New Datatype.
NOTE: The purpose of this option is to allow you to add a revenue or expense category that contains no actual history. For example, if the AARP health plan does not contain drug expense historically, but now we wish to include it for planning, this option will accommodate that expense category.
-
In the Select Datatype field, type the name of the data type or click Choose Value to select the data types.
- Click OK.
Because you can only add one instance of a data type, the list of available data types diminishes as they are added to the driver for a particular location. If all the data types have been used, then the message No additional Datatypes available for insertion replaces Double click to Add New Datatype at the bottom of the list.

Deleting data types
After you select the data types to delete, the system does not remove them until after you save the driver.
To delete a data type:
-
Next to the name for each data type to delete, click the Save cell drop-down, and select Delete.
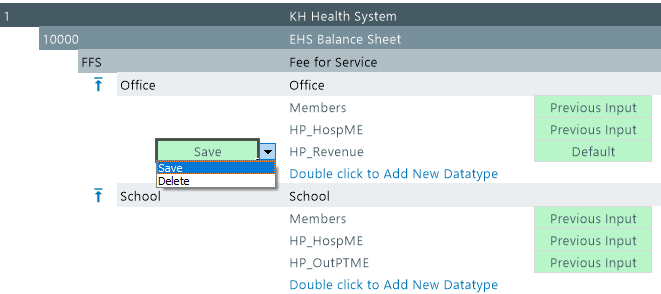
- In the Main ribbon tab, click Save.
What if there are no members in a plan?
New plans will likely have no members or historical information in the system, but you can still use this driver to manually enter membership numbers and begin the health plan budget process. In this situation, the membership row displays Members Not Found and the system displays zeroes in the white cells of the actual period columns. However, in the blue cells, you can manually enter member numbers and revenue/expense stream values, as needed.
TIP: Instead of entering the new plan information in this driver, another option is to simply enter this same data in the ACT_HP_20XX table. The system will then pull in the data from the table as the starting point for the new plan.

